描述
技術規格
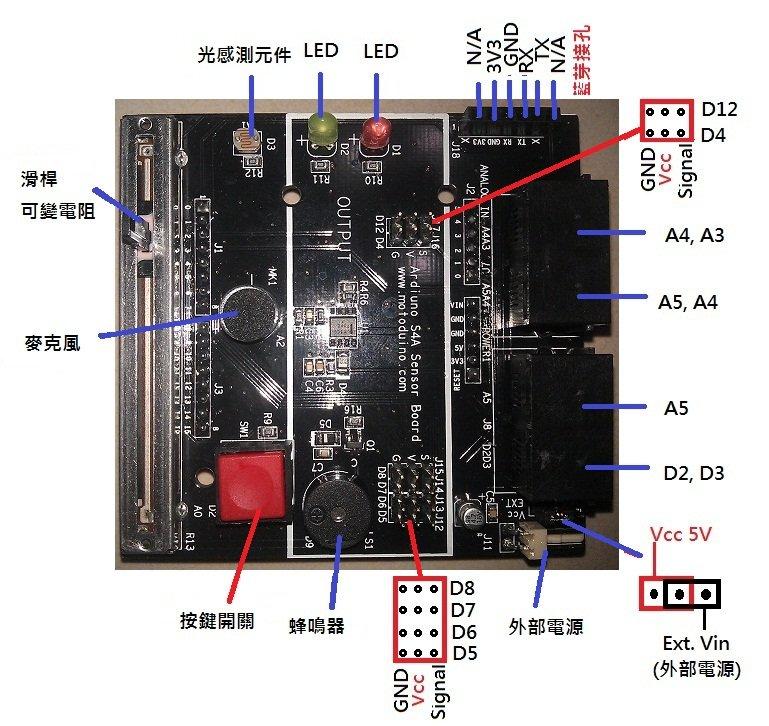
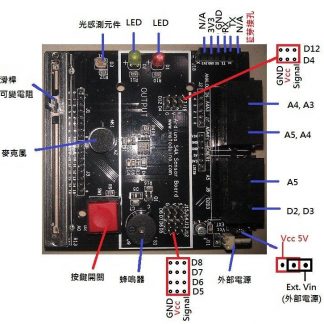
1. 四個RJ11接頭容易外接其他裝置(D2/D3, A3,A4,A5)
2. 一個一公分大小的按鍵開關(D2)
3. 一個蜂鳴器(D9)
4. 一個麥克風( A2)
5. 兩顆 LED 顯示,一顆為紅色(D10),一顆為綠色(D11)
6. 一個滑桿可變電阻(10K),有效行程65mm.(A0)
7. 一個光感測元件(A1)
8. 預留一個藍芽孔位(UART)
9.尺寸: 8 x 8.3 cm
商品內容
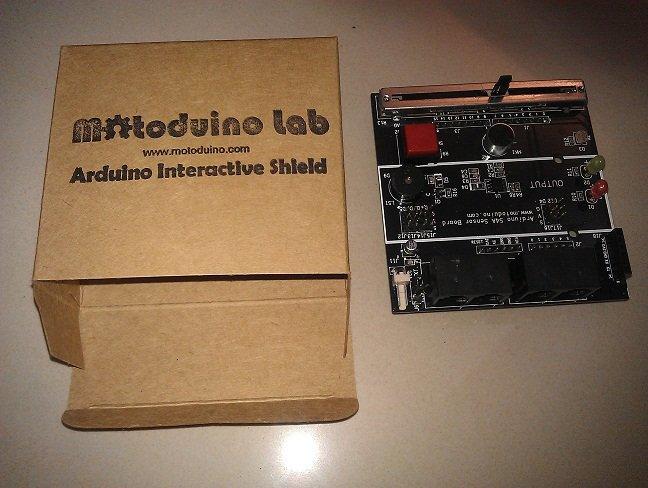
§ S4A Sensor Board 1個
程式範例
/*
S4A sensor board testing sketch
Input components: Light sensor, microphone, VR slide, Button
Output components: Red Led, Green Led, Buzzer(speaker)
Author: https://motoduino.com
Description: S4A sensor board is suitable for arduino.
*/
// INPUT PIN
const int VR_InPin = A0; // Analog input pin that the potentiometer is attached to
const int CDS_InPin = A1; // Analog input pin that Light Sensor is attached to
const int MIC_InPin = A2; // Analog input pin that the microphone is attached to
const int Button_InPin = 2; // Analog input pin that the microphone is attached to
// OUTPUT PIN
const int Ledred_OutPin = 10; // Analog output pin that the RED LED is attached to
const int Ledgreen_OutPin = 11; // Analog output pin that the GREEN LED is attached to
const int Buzzer_OutPin = 9; // Analog output pin that the Buzzer is attached to
int sensorValue = 0; // value read from the pot
int outputValue = 0; // value output to the PWM (analog out)
int length = 15; // the number of notes
char notes[] = “ccggaagffeeddc “; // a space represents a rest
int beats[] = { 1, 1, 1, 1, 1, 1, 2, 1, 1, 1, 1, 1, 1, 2, 4 };
int tempo = 300;
// variables will change:
int buttonState = 0; // variable for reading the pushbutton status
char val; // variable to receive data from the serial port(bluetooth)
void playTone(int tone, int duration) {
for (long i = 0; i < duration * 1000L; i += tone * 2) {
digitalWrite(Buzzer_OutPin, HIGH);
delayMicroseconds(tone);
digitalWrite(Buzzer_OutPin, LOW);
delayMicroseconds(tone);
}
}
void playNote(char note, int duration) {
char names[] = { ‘c’, ‘d’, ‘e’, ‘f’, ‘g’, ‘a’, ‘b’, ‘C’ };
int tones[] = { 1915, 1700, 1519, 1432, 1275, 1136, 1014, 956 };
// play the tone corresponding to the note name
for (int i = 0; i < 8; i++) {
if (names[i] == note) {
playTone(tones[i], duration);
}
}
}
void setup() {
// initialize serial communications at 57600 bps:
Serial.begin(57600);
pinMode(Ledred_OutPin, OUTPUT);
pinMode(Ledgreen_OutPin, OUTPUT);
pinMode(Buzzer_OutPin, OUTPUT);
// initialize the pushbutton pin as an input:
pinMode(VR_InPin, INPUT);
pinMode(CDS_InPin, INPUT);
pinMode(MIC_InPin, INPUT);
pinMode(Button_InPin, INPUT);
}
void loop() {
buttonState = digitalRead(Button_InPin);
// check if the pushbutton is pressed.
// if it is, the buttonState is HIGH:
if (buttonState == HIGH) {
// turn LED on:
digitalWrite(Ledred_OutPin, HIGH);
// Buzzer testing
for (int i = 0; i < length; i++) { if (notes[i] == ‘ ‘) { delay(beats[i] * tempo); // rest } else { playNote(notes[i], beats[i] * tempo); } // pause between notes delay(tempo / 2); } digitalWrite(Ledred_OutPin, LOW); } // Test VR // read the analog in value: sensorValue = analogRead(VR_InPin); // map it to the range of the analog out: outputValue = map(sensorValue, 0, 1023, 0, 255); // change the analog out value: analogWrite(Ledred_OutPin, outputValue); // Light sensor testing // read the analog in value: sensorValue = analogRead(CDS_InPin); // map it to the range of the analog out: outputValue = map(sensorValue, 0, 1023, 0, 255); // change the analog out value: analogWrite(Ledgreen_OutPin, outputValue); // microphone sensor testing // read the analog in value: sensorValue = analogRead(MIC_InPin); // map it to the range of the analog out: if(sensorValue > 200)
{
outputValue = map(sensorValue, 0, 1023, 0, 255);
// change the analog out value:
analogWrite(Ledred_OutPin, outputValue);
}
// print the results to the serial monitor:
// Serial.print(“sensor = ” );
// Serial.print(sensorValue);
// Serial.print(“\t output = “);
// Serial.println(outputValue);
// wait 10 milliseconds before the next loop
// for the analog-to-digital converter to settle
// after the last reading:
delay(10);
}
接線範例
可直接把S4A Sensor Board 底下排針對準Arduino 腳座插上去即可。藍牙模組(選購)可以直接插在藍牙預留腳座!


